Sunday, September 22, 2013

Tomato Candy! - Oven-Dried Goodness

10 years ago, if you would have told me I would be writing a blog post about how much I love tomatoes, I would have called you crazy.  As a child, I hated tomatoes.  I thought they were gross, slimy and overall just disgusting.  When I first met my husband we would go on dates to nice restaurants and when the salads came, both of us would take off the tomatoes and set them aside.  Any sandwiches we ordered that came with tomatoes got the same treatment.  I used to joke with him that maybe we should both find someone who liked tomatoes, so we didn't have to go through life wasting them.  Thank goodness he didn't take me up on that!  Now, it is just the opposite and neither one of us is likely to share our tomatoes.  Go figure!

Cut the tomatoes lengthwise and line them up
on the baking sheet.
Over time your palate changes and the things you used to like and enjoy become less interesting and other things you never could stand to eat suddenly become some of your favorite foods. I have a very long list of those foods actually - - eggs, mayonnaise, blue cheese, olives, mushrooms and of course, tomatoes, are just a few of the foods I used to abhor and now I absolutely love.  Looking at that list, I actually don't know what I used to eat!  Jeesh.

As I've worked my way through cook books and eaten amazing meals at various restaurants I've had the opportunity to try new foods.  I think the tomato tide started to turn when I tasted my first heirloom variety.  It was so sweet, and didn't have all the seedy pulp and mealy texture I had previously known tomatoes to have.  Drizzled with just a little extra virgin olive oil and nestled in amongst fresh mozzarella cheese and basil, with just the perfect amount of cracked black pepper and salt.  It was delicious!  And from there, the transformation began.

I used several varieties of
tomatoes, but you could use
all one kind.
One of the things I learned about tomatoes is that you should never store them in the refrigerator.  That is what gives them that mealy and gritty texture.  It basically sucks the sweet flavor right out of them.  Instead, they should be stored in a cool, dry place (I keep mine in a bowl on the counter).  In the summer, at the peak of harvest time, I usually have a several bowls of them.  They find their way into just about every recipe from scrambled eggs to sauces and, my absolute favorite way to enjoy them, Caprese Salads.

After they are dried in the oven
this is what the tomatoes look like.
This year was such a great year for my garden that I needed to find a new way to prepare and utilize them so they didn't go to waste.  The Roma's I grew weren't as large as previous years so they didn't lend themselves to making red sauce.  And having done that in years past I really didn't want to spend the time to blanch and skin the tomatoes.  Its just such a process.  So, as I thought about all the different variations of tomato preparations, having them on hand all through the winter in the form of oven-dried morsels of goodness seemed like the perfect way to go.  And man, it couldn't be any easier than this recipe.

Close up shot of the oven dried
nuggets of goodness!
All you need to do is wash the tomatoes and then halve them lengthwise - - cutting through where the stem would be.  Then you simply arrange them on a baking sheet with the skin side facing down.  Then be sure they aren't touching one another, and drizzle them with a little olive oil, salt and pepper.  I used Silpat baking sheets, but if you don't have them, parchment paper would work well.  I had enough tomatoes to fill two full sheets!

Put the baking sheets into a 225 degree oven for 6-8 hours, depending on what type of tomato you are using and their size.  Since I used a variety I just pulled the ones off the pan as they got finished.  Just check back every 30 - 45 minutes or so to see how they are doing toward the end.  I also took the opportunity to roast some garlic along with the tomatoes by placing unpeeled cloves directly on the pans next to the tomatoes.  You can either put it into the jars with the tomatoes as I did here, or use it to smear on some crusty bread.  Either way, don't miss out on the opportunity since you'll have the oven on low and slow anyway.

Add the roasted garlic and fresh
Thyme right to the jar before
adding the oil.
The transformation that takes place here is something out of a fairy tale.  The peak of the season already produces amazingly sweet and succulent tomatoes, but by drying them you are concentrating the flavors.  My husband happened by while the sheets were cooling on the counter and gave one a try and immediately exclaimed, "Oh my God, they taste like candy!"  Yup, tomato candy.  They are sweet and just a little bit chewy, and taste just like summer.

I put all the cherry tomatoes together in this
smaller jar with the herbs and garlic.


After the tomatoes are dried and cooled, you can fill your jars.  I also put in some fresh Thyme along with the peeled garlic I had roasted.  Then the only thing left to do is fill the jar with olive oil to cover the tomatoes.  Since these aren't sterilized in a water bath, you can't leave them out on the counter.  I don't mess around with bacteria and botulism.  Since I have the fridge space available I don't mind storing them there to be safe.  

The oil will firm up a bit in the fridge and turn opaque, but you just need to set it out on the counter for a few minutes for it to soften up.  It doesn't effect the flavor at all.  The oil, which is now flavored with the delicious flavor of sun-dried tomatoes, is also perfect for making salad dressings or even just drizzling over fish or steak. You could dice up the tomatoes and use the oil with pasta and maybe some fresh mozzarella as a no cook sauce as well.  The heat of the pasta would warm through the tomatoes and be delicious.


Update: After I finished making this initial recipe with the jars of olive oil that you see above, I also made two other batches of these oven-dried tomatoes.  (I told you my garden was doing well this year!)  This time though, instead of taking up fridge space, I just placed them on sheet trays in my freezer (after they were dried) until they were frozen - - about an hour - - and then placed them into a zip lock bag.  Doing this ensured they didn't freeze to one another in a giant blob.

Now I have a huge supply of delicious tomato goodness available for me all winter long.  I can reach into the freezer and pull out as many as I need to use in sauces, soups, meatloaf or with pasta.  The winters around here are long and cold.  So I can't wait for a blustery winter day when I can reach into the freezer and remind myself just what the bounty of summer tastes like!

Monday, August 19, 2013

From Scratch - - Hummus!

With just a few short weeks of summer left (*sob!*), I've been trying to find as many ways as possible to really take advantage of the season.  Like most of my ideas, this one involves food!  I thought it would be fun to try and find as many tasty ways as possible to use up the veggies from my garden and branch out into making things I've never made from scratch.  So I opened my refrigerator in search of some inspiration, and lo and behold I saw one of my "go to" condiments and favorite dips, and I just knew it would be the perfect challenge - - Hummus!  

I love the stuff.  I usually buy different varieties depending on my particular craving, but I've never tried to make it myself.   I've heard everyone say it is easy to make, and that the store bought stuff doesn't hold a candle to the versions made from scratch...but still I reverted to the grab and go containers full of preservatives and artificial, well, everything.

Just a few ingredients is all you need!  I kept double
checking when I  took the photo because it seemed so empty! 
So back to my challenge!

I decided to try my hand at making hummus from scratch to give me something to dip my fresh veggies in.  I'm happy to report that it really is super easy, and now I'm pretty sure I'm going to have a new food addiction on my hands as I try out every possible recipe and variation I can think of.  But considering how my garden keeps on gifting me with cucumbers and peppers, I will have no shortage of tasty vessels with which to eat it up!

Just pile it all into your food
processor and give it a whirl!
For this first attempt though, I stuck to the basics and made a plain variety.  I wanted to test run the original before I went and got all fancy.  I know, I even surprised myself with that decision!  So first things first, I had to find myself some Tahini.  The local grocer didn't have it, (or at least didn't have it in the 3 or 4 different spots I tried to find it) so I ended up at a higher-end grocery store before I located a jar. Tahini is a paste made from ground, hulled sesame seeds.   

In my hunt to research various recipes for this challenge, I found a few that claim you can make hummus without tahini.  The flavor profile is so delicious though that it might just be worth the hunt.  And while I don't usually like to buy speciality items or things that are only used in one type of preparation I learned that you don't have to refrigerate the open container and it seems to have a pretty decent shelf life so I will be able to use it up before it goes bad on me.   [Note to self: Find other tasty uses for tahini!]  If you can't find tahini and you still want to give making the recipe a try, you can substitute peanut butter to get some similar nutty flavor.  The consistency isn't quite the same so you will need more liquid from the beans but it will certainly still be tasty!

When I say the recipe is super simple, I'm not exaggerating.  When I lined up the ingredient picture above, I kept having to double check my ingredients because it seemed like I had to be missing something.  The first step is draining the can of chickpeas (also called garbanzo beans) and putting them into your food processor or blender.  You want to save the liquid from the can, so set that aside for now.  Then, throw all the rest of the ingredients into the blender with the beans and puree it together.  Once blended, check the consistency and then add in just enough of the liquid from the can to make it a thick and smooth consistency that suits your taste.  The end.

No, seriously.

Other than spooning it into a serving bowl and drizzling it with a little bit of olive oil and a few sprinkles of paprika to make it look extra "gourmet", you are staring at the finished product ready to eat.
Mini wheat pita bread and fresh cucumbers made great dippers
for this quick and tasty hummus!
You can serve it with your favorite pita, chips or veggies.  As I mentioned when I started this whole entry, I had a serious overflow of cucumbers to devour so I sliced them up and got to snacking.  Another really great way to use hummus is as a spread on sandwiches.

Since it is a dish you are eating raw the real flavors of the ingredients will come through so be sure and use a good quality Extra Virgin Olive Oil.  Oh, and you absolutely, positively have to promise me that you will use a real lemon.  Not the one that comes in a bottle!!  I know you might be thinking you can get away with it and it will taste the same, but you would be SO wrong!

Overall, I think my food challenge was a grand success.  For the next phase I'm going to start experimenting with different varieties of flavors and toppings, so let me know what your favorite hummus combination is and I will give it a try!  I just finished harvesting and making the most delicious oven-dried tomatoes last night.  The entire time I was making them I just kept thinking about how delicious they would be mixed into this hummus.  I will definitely be mixing up a batch of Sun-Dried Tomato Hummus this weekend. And, of course there are all my other favorite versions - - Roasted Garlic, Roasted Red Pepper, ....oh, I could mix in some homemade pesto and use it as a spread on a sandwich ....  the possibilities are endless!

Happy Snacking!

Close up shot of the finished creamy hummus drizzled with Olive Oil and just
a sprinkle of Paprika!  So tasty! 

Homemade Hummus
1 (15 oz) can chickpeas
1/4 cup (or more to taste) liquid reserved from chickpeas
Juice and zest of one lemon
2 Tablespoons tahini
2 garlic cloves
1/2 teaspoon kosher salt (to taste)
2 Tablespoons of Olive Oil
Paprika (optional) 


Sunday, August 11, 2013

Lemon Glazed Zucchini Bread

Everyone keeps saying that this summer is going by too quickly; the weather hasn't been the greatest in terms of temperature.  Despite that fact, I have been trying to make the most out of every opportunity.  The cooler weather and strange slow start to summer meant great things for my garden.  The first harvest of radishes was awesome, and the two varieties of lettuce I planted (mixed greens and a mesclum mix) have provided an abundance of yummy salads.  My Kirby cucumbers grow faster than I can pickle them and now the tomatoes and squash are competing with each other for who can produce the most!  Seeing my grocery bill shrink because I have all the fresh produce in my own backyard is such a nice rewarding feeling.

Check out those cute 8 Ball Squash!
I tried planting a new variety of squash this year, called "8 Ball" which is a little small round squash that looks just like a little pumpkin.  I have been really happy with how they have grown.  Both of my plants are just humongous! So, because they are coming in so quickly, I keep giving them away to friends and neighbors.  My next door neighbor is an elderly woman who just loves to get the fresh veggies we bring her.  This time, my good karma paid off because she turned my extra zucchini into some yummy bread and brought us over a small loaf as a thank you!  :)  So tasty!

Well that got me to thinking that I hadn't ever tried to make zucchini bread.  We've grilled it, roasted it, put it into salads and even sliced it paper thin and served it as a crudo with a fresh lemon vinaigrette.  So, why not bake it into a tasty bread that we can freeze and eat throughout the fall and winter months?Inspired by my neighbors tasty traditional version, I went in search of some unique and fun variations and found two excellent recipes - - one for a Lemon Zucchini bread with a glaze and one for a version with Nutella and honey.   My husband is a huge fan of lemon poppyseed cakes and muffins and he's never met a chocolate dessert he didn't like, so I figured it was worth a shot!

Shredded Zucchini sits in a
colander to drain the water
I will have to blog about the Nutella version sometime soon, but here is how the Lemon Zucchini bread turned out.  I started by grating the zucchini on a box grater using the largest option and placing it into a colander to let the water drain off.  Then I sprayed a non-stick loaf pan with cooking spray and lined it with parchment paper.  Some recipes will tell you to flour it to keep it from sticking but that method never seems to work for me and then half of whatever I'm baking ends up staying in the pan.  So now I always take the extra minute to cut the parchment to size and tuck it neatly into the pan, leaving just an inch or so of overhang on long sides.  The spray helps hold it in place and keeps the two ends from sticking as well.

Use one bowl for your dry ingredients,
and another for the wet.
Combine the flour, baking powder and salt in a large bowl.  Then, in another bowl beat 2 eggs with the oil and sugar.  Mix well.  Add in the buttermilk, lemon juice and zest and combine.  I think the addition of the buttermilk is what gives this bread a great tangy and rich flavor so you could substitute if you didn't want to use it or if you didn't have it on hand you can always make your own quick version.

Once you have all your wet ingredients mixed, you can stir in the zucchini.  Be sure and squeeze out the excess water before you add it.  I just used my fingers to pick up small handfuls and squeezed the moisture out; no need to dirty a dish towel.  Its amazing how much water you can remove that way.  Add the wet ingredients to the dry and stir until just combined.  Don't do it the other way around or you will end up with lots of clumps of flour and a lumpy finished batter.  You might not think it would make that big of a difference but after you've made the mistake once and tried dumping your dry into your wet only to be met with an awful bowl of lumps, you will believe me!

Pour the batter into the prepared pan and bake for 45-55 minutes or until a toothpick inserted in the center comes out clean.  Let it cool for a few minutes and then grab each side of the parchment paper and gently lift it out of the pan.  Set it on a wire rack to cool completely.  I tasted the bread just like this, without the glaze and it was pretty good all on its own.  So, if you want a finished product less on the sweet side you can stop there and enjoy.  But if you like your bread a bit more on the sweet side, you can take the extra step and make the glaze to pour over the top.

Finished loaf right out of the
oven.  Note the parchment paper
"handles"! 
The glaze could not be simpler to make.  You just take 1 cup of powdered sugar (be sure and break up any lumps) and add the juice of one lemon and a little splash of lemon extract (optional).  Then add in the milk and stir until you get the desired consistency.  It doesn't take much milk so I usually add in a tablespoon at a time, stir and then see how it looks. Carefully spoon the glaze over the cake letting it run down the sides and cover the top.  I did this on a plate and just kept spooning the excess back over the top of the bread until it was nicely coated.  Once it sits for a bit, it will harden up nicely.  The recipe I adapted this from also suggested adding 1/2 teaspoon of meringue powder to get the glaze to harden up even better.  I will have to give that a try next time!

It's a nice light color with small
specks of the lemon and zucchini
I'm pretty happy with the end result so I will definitely be making more loaves to tuck into the freezer as my garden keeps providing me with the beautiful squash.  That way I will have them at the ready and can mix up quick batch of the glaze and have homemade Lemon Zucchini bread for visiting houseguests or even just a treat on a weekend!

We can add this homemade bread to the list of reasons I love having a garden.  It might not be the ideal summer temperature, but at least I can complain about it while eating a piece of Lemony Zucchini bread and licking the glaze off my fingers!


The glaze coats the bread and glistens
nicely, beckoning you to cut a slice and enjoy! 


Lemon Zucchini Bread 
2 cups flour (All Purpose)
2 tsp baking powder
1/2 tsp Kosher salt
2 eggs
1/2 cup canola oil
2/3 cup sugar
1/2 cup buttermilk
2 Tbl fresh lemon juice and zest (1 lemon)
1 cup grated zucchini

Lemon Glaze
1 cup powdered sugar
1/2 tsp lemon extract (optional)
milk, as needed to reach desired consistency 

Sunday, July 21, 2013

Maurice - - the Watermelon Turtle!

I can't believe how quickly the summer seems to be flying by!  Sorry its been so long since I've had a chance to post a new blog.  I have been spending almost all my free time working in my garden and enjoying the amazingly HOT weather.  Compared to last year, when I had to water the yard and the garden a few times a day, this summer has been just awesome in terms of rain.  My tomato plants are literally 6' tall and I just added in a new trellis this morning to help support my Kirby cucumbers that are trying to climb over the garden shed!

It's been a summer like I remember when I was little....hot and sticky weather where you can just go run around the yard and then find a sprinkler to cool off when you get too hot.  Drippy, sweet popsicles making way for bright blue and orange tongues on the kids running through the yards, and of course the smell of BBQ grills wafting through the evening breeze.  Ah, summer!

Line up your tools so everything
is within reach once you start the project.
This year, it was the 4th of July cook out that gave us our first opportunity to taste another staple of summer - WATERMELON!  I can't tell you how much my husband loves the stuff.  I think he could eat an entire watermelon by himself in a sitting.  I can't cut it up fast enough for him.  But rather than just cutting it up and putting it into a bowl, I thought I would have a little fun and make something a bit more whimsical this year.  A friend had sent me a cute picture from Pinterest of a watermelon Sea Turtle earlier this year, so I set out to create him.  There weren't any directions with the picture, just some close ups and different angles so I was pretty much on my own to figure out how to assemble it.

You want to cut a small slice off the
bottom to help it lay flat.
Believe it or not, it really wasn't too difficult and since you get to eat all the tasty watermelon you aren't really wasting any of the fruit.  He actually became kind of the mascot of the party and wherever we went, he came with us.  I'm not sure at what point we decided to name him Maurice, but I credit my father-in-law for the name.

Start out with a large watermelon that looks like it would make a good Sea Turtle shell; I held up several at the grocery store until I'm sure people thought I was a little bit goofy.  You want to pick one that feels heavier than it looks.  That is how you know it will be ripe.

You should have 3 pieces.  A small slice off the
bottom and then the top piece that will become
the Sea Turtle shell.  The largest portion becomes the
bowl you put the fruit in! 
You will want a nice large work area so you can keep everything close at hand as you build your turtle.  I put down some plastic place mats that I had in the cabinet just as an extra precaution but it really wasn't too messy.  Gather up your "tools", which in this case is a melon baller, a large knife and a zesting tool we use to make garnishes for drinks.  You will also need a large bowl for the melon to go in once you have gotten to that point in the process.

Get that melon baller into action! 
The first step in the process is cutting a small slice off of the bottom of the watermelon to help it lay flat.  You will use this piece to carve out the head, legs and tail so it needs to be large enough to give you watermelon rind to work with.  You do need to cut into the watermelon itself - there will be some of the pink flesh showing.  But don't worry, when you set it down on the platter or plate you are going to serve it on you won't see it.

Place all the melon balls into a bowl as you work
your way through the fruit.  I enlisted the help of my
mother-in-law, while I started carving.
Next, you need to cut the piece off the top that will become the Sea Turtle Shell.  You want this to be a larger slice and should be almost half of the remaining watermelon.  You can just eyeball it - - there aren't any watermelon turtle carving judges that will come by and critique you so just have fun with it.  Once you have your three pieces cut you can start using the melon baller to clean out the flesh of the watermelon.

Be careful when you are creating the "bowl" part with the main part of the fruit that you don't go down too far to the bottom. You want to leave enough thickness so you can fill it with fruit and have it keep its integrity.  Remember, you sliced off the bottom so it would sit flat but you did cut into the flesh so just be cautious and leave a good solid bottom.  You can completely clean out the piece that will become the turtle shell.  It will make it easier to work with if it is lighter and cleaned out.
Small squares - spaced out around the entire
outside rim of the watermelon - make for a
nice simple detail.

Now, the fun part!  Take the bottom (bowl) piece and working your way around the edge, you can carve out small little squares all the way around.  The focal point will become the turtle itself but this does pretty up the bowl portion and since you are likely to take the star of the show off the top for serving this leaves you a pretty and decorated bowl.

Carve out a small head --
with a neck to use for attaching
to the turtle shell
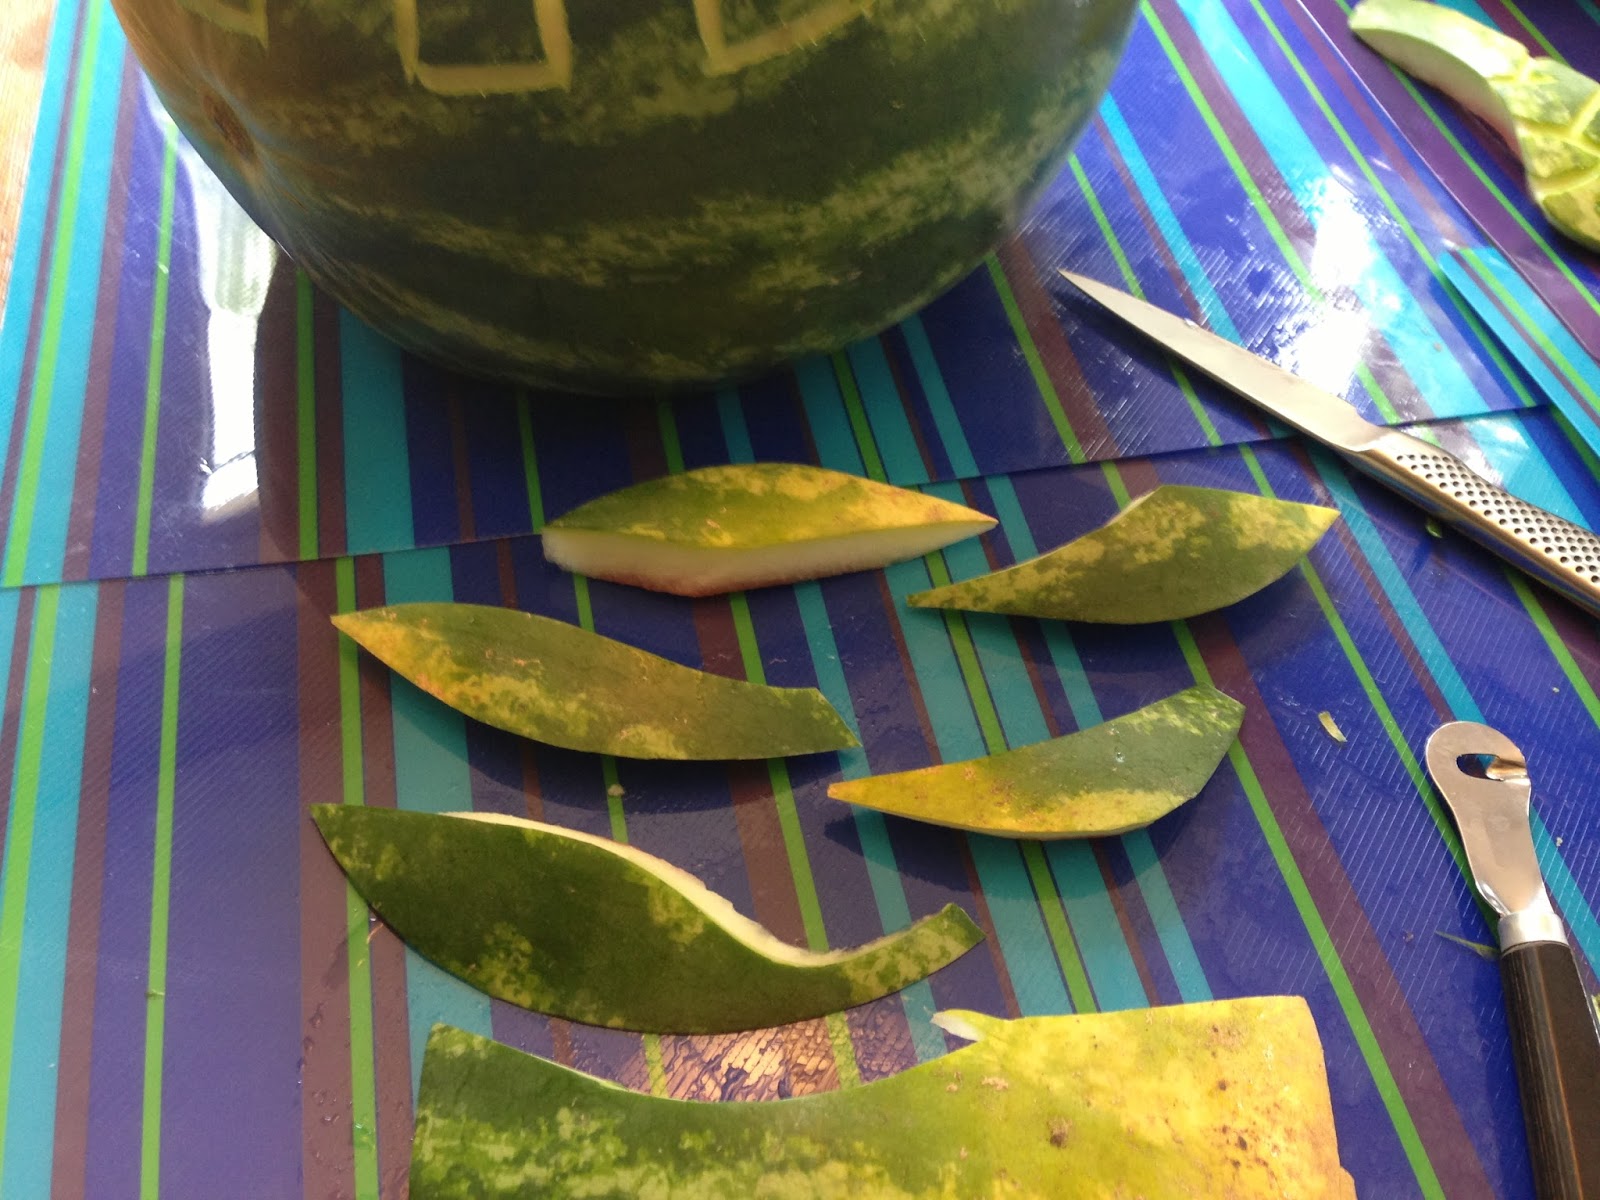
The smallest piece that you cut off the bottom is what is going to become the head, legs and tail of the Sea Turtle.  Pick a part of the rind that looks the nicest for the head and then just slice out smaller angled pieces for the rest of the legs - - and don't forget a tail!

Four legs and a tail! 
You can use a knife to clean off the underside of the pieces so they don't have any fruit on them and they are thin enough to attach to the shell.  Don't worry too much about making the legs or tail "perfect".  They really just need to similar in size and shape so they look uniform on the final product.  Once you have the pieces cut out,  you can get to work on carving out the pattern on the shell and the head.  I just put a few small carvings on the head to make it look cute, and then bored out holes using a paring knife and stuck black peppercorns in for the eyes.

A close up of the shell being
carved into hexagon shapes.
On the shell, you are creating a repeating hexagon pattern so if you start in the middle and then work your way to the front and back, it ends up balancing out and looking really great without having to measure or be very precise.  You can really do whatever pattern you think would be cute.  I put a border around the shell that added some detail as well.  The coloring on the watermelon really does all the work for you so I think its best to keep it simple.

Attach the legs and head with toothpicks.
You can attach all the pieces using toothpicks or wooden skewers.  It doesn't matter if they stick out or show a little because no one is going to be looking at the bottom anyway.  I just used some kitchen shears to snip off the extra toothpick that was sticking out, so that the turtle could sit flat on top of the bowl of fruit.  Once you have them all attached, you can fill the bowl with the rest of your fruit - I used grapes, pineapple and of course the watermelon.

Filled to the brim with tasty fruit salad! 
From start to finish it only took me about 35 minutes to create.  I enlisted help with the melon baller so I could focus on the carving portion, but it really was fun and easy.  And it was definitely the talk of the party.  At some point, we lost track of Maurice, and found him lounging by the hot tub.  It was just that kind of party!  ;)


Happy Summer!
Finished Sea Turtle Maurice in all his 4th of July glory! 


Tuesday, June 25, 2013

Bacon Wrapped Cheddarwurst Poppers

Sometimes it can be hard to find fun and exciting ways to re-imagine common or classic dishes.  Other times, all it takes is a simple idea to totally transform something you think you knew into something even more amazing.  That is how I felt when I first saw this idea.  It was definitely a, "Why didn't I think of that?!" moment...  At each stage of the process as I assembled this dish I grew more and more excited.   After all, it combines one of my favorite sinful treats, jalapeño poppers with one of my favorite summer foods, Cheddarwurst sausages.  Wrap it all up in a blanket of bacon and you have quite possibly the tastiest appetizer I've had in a long time.

Nice large jalapeños are perfect
for this recipe! 
The smokey sausage and creamy filling plays the perfect balance to the heat from the jalapeño pepper while the crispy bacon adds a nice crunch and bacon-y goodness that makes for the perfect bite.  With the warm weather finally here to stay, and backyard cookouts in full swing, these make for a really fun appetizer if you are looking for something decadent to serve to your friends.  They are so good that people might forget what you serve for the main course!

All cleaned and ready for filling!
To get started, you need to find some nice big jalapeños.  You can make these as hot or as mild as you want by either removing the ribs and seeds or leaving them in the peppers.  I also made a few of these using regular bell peppers and I'm happy to report that they turned out great so if your family doesn't like the heat from the jalapeños or you have younger children that can be a great alternative.

Cut the stems off the peppers and halve them.  I scooped out the ribs and seeds when I made them, leaving a perfect little cup ready to be filled.  In a small bowl, combine the sour cream, cream cheese and shredded cheese.  Add in the salt and pepper to taste and stir until it is well mixed.   I used the Veggie Cream cheese in these to add another layer of flavor that I think is really great.  You get the onion flavor coming through that is better than just plain cream cheese, but anything you had on hand would be fine.  Hmmmm...maybe I will try these with a smoked salmon cream cheese.  ::: drool :::

Mmmmm....cheesy!
Take the sausages, and cut them in half and then cut each half lengthwise so you have small little planks that will fit on top of your jalapeños.  This will vary depending on how big your peppers are so just eyeball it.  If you use the cheesy smokey style I did you will see the tasty little pockets of cheesy goodness peeking thru.

Filled to the brim with the creamy mixture,
the peppers are ready for their  sausage toppers
Now you are ready to assemble!  I sprinkled a little bit of the shredded cheese in the bottom of each pepper.  Then, using a small spoon, fill the pepper with the cream cheese mixture.

Rather than taking each of the peppers all the way through the entire preparation, I find it easier to use the "assembly line" method and get each stage of the process done before moving on to the next step.  That way, you don't end up with greasy hands from the bacon and a messy work area. 

Once you have them filled, place one of the sausage planks on top of each pepper.  Push it down into the mixture slightly to secure it.  Once you have them all assembled to that point, go get your bacon out of the fridge.  By keeping it chilled up until this point it will be easier to wrap tightly around the pepper which gives you a better chance at it staying together when you cook them.  

Bacon wrapped tightly, overlapping to help keep
the filling inside the pepper.
To wrap the peppers, just pick up one of the halves and starting at one end wrap the bacon all the way around.  Overlap it as you go so it is nice and tight and completely covers the sausage and cream cheese filling.  When it bakes, some of the cheese will ooze out so you want the bacon wrapped tightly to help keep the filling inside the peppers.  You can use a toothpick to keep the bacon in place if you want.  But if you plan on grilling them, be sure to soak the toothpicks in water before hand.

At this stage, you can either bake or grill them.  If you grill them, you are going to have to keep the grill at a medium steady temperature.  You should not turn or flip these at all.  Just set them on the grill, and cook them with the cover closed so the heat inside the grill crisps up the bacon.  Indirect heat would be best for this, so place your coals off to one side and place the peppers on the side without the coals.  Grill until the bacon is crispy and brown and the peppers are cooked through.  

They look like bacon wrapped
presents for your guests to enjoy!
To bake them, set the oven at 425 degrees, and bake for 25-30 minutes.  This will depend on your oven and the size of the peppers you are using, so just keep an eye on them.  You want the bacon to be crispy, but not burnt.  Some of the cream cheese filling will ooze out, but don't worry too much about that.  When you transfer them to a serving dish they will look fabulous.  

A great shot of the filling and
sausage wrapped in crispy bacon!
You can use aluminum foil on your pan if you want an easy clean up.  My husband was lamenting that I forgot that step when I made them because I was so excited to get them in the oven!  Lucky for me, he loved the final product so I was quickly forgiven.  

Just one bite and we both decided that this treat was a definite winner.  And, considering that the Chicago Blackhawks went on to win an amazing last minute Stanley Cup victory later that evening, I think these might have become our "good luck" game time snack!


Bacon Wrapped Cheddarwurst Poppers
5 large Jalapeños
10 - 12 pieces Bacon
Cheddarwurst sausages
1/2 c. shredded Colby Jack Cheese
1/2 c. Cream Cheese (I used Veggie)
1/4 c. Sour Cream
Salt and Pepper


Tuesday, June 4, 2013

The Magic of A Garden

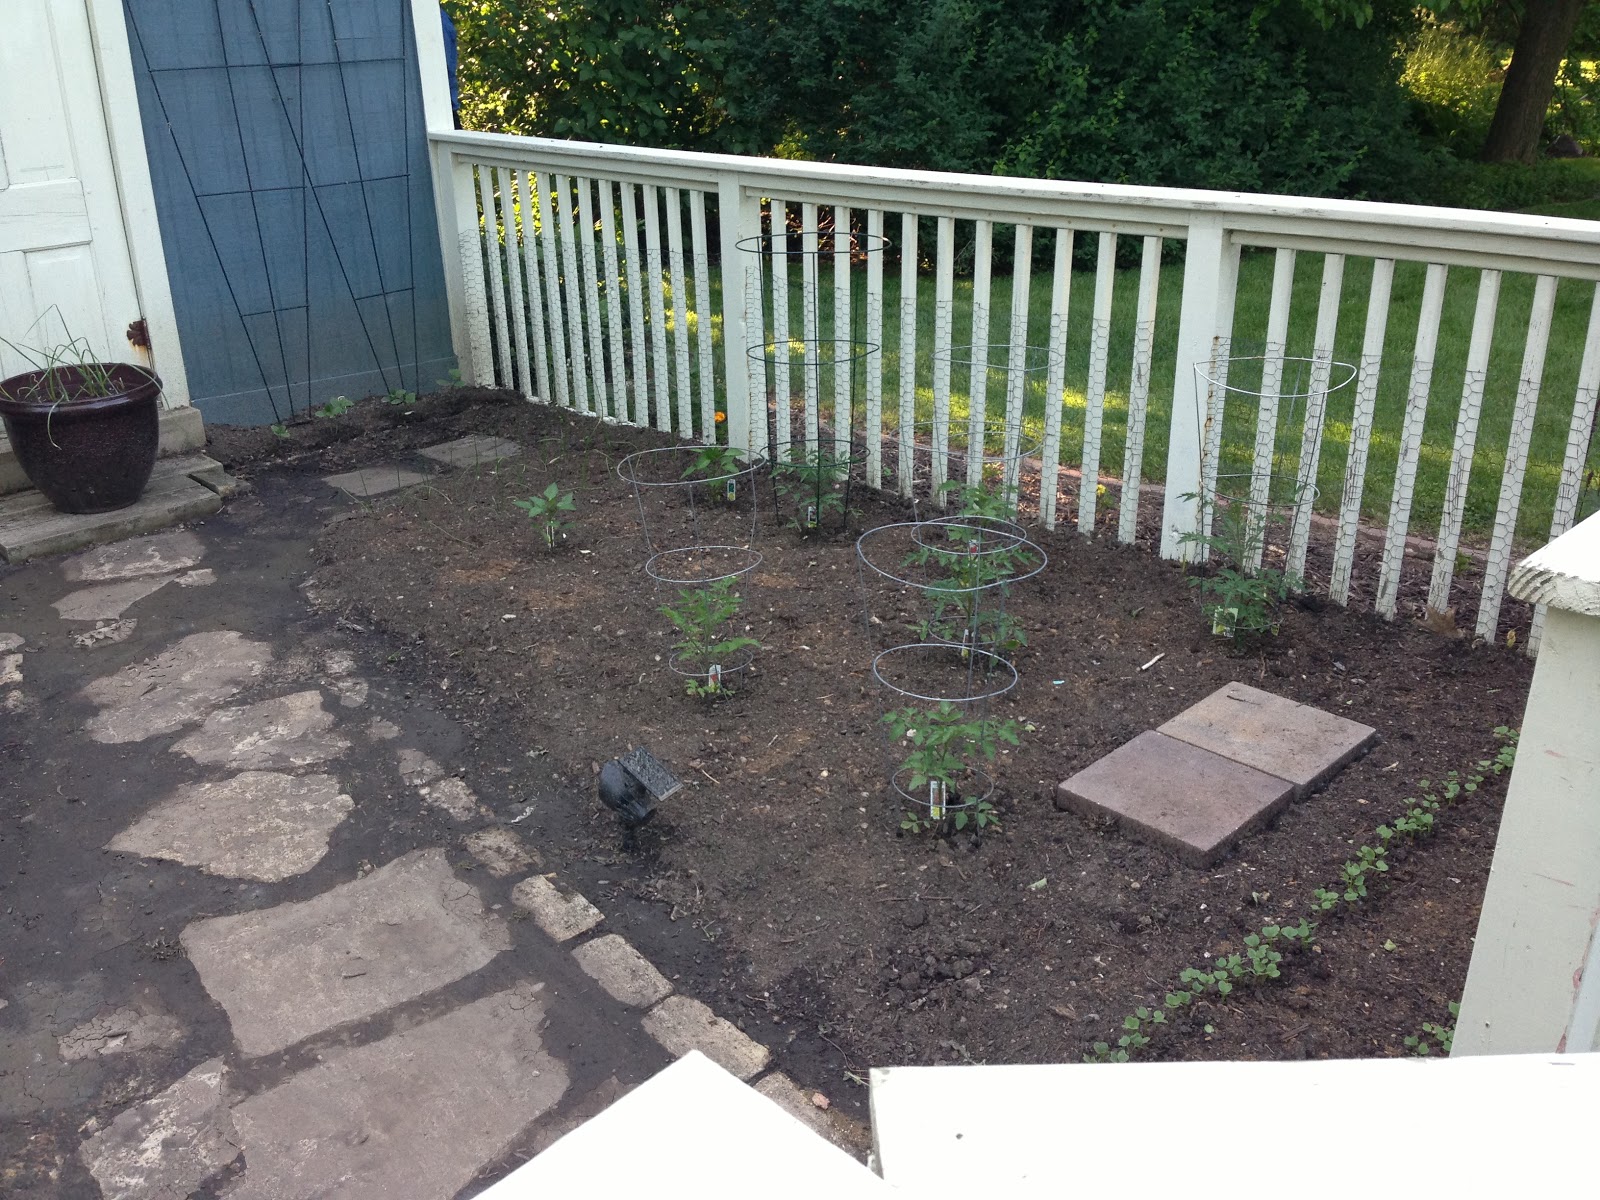
This will be the third year I have planted a vegetable garden.  When we moved in our current home, most of the groundwork had already been done.  The previous owners had put up a cute little white fence (completely lined with rabbit-proofing chicken wire) surrounding the most perfect little plot of earth.  Not so big that it proves to be overwhelming, but plenty of space to happily grow a variety of plants.  As soon as I saw it, I knew I needed to start a garden.

Working the manure, compost
and dirt with the tiller.
Mother Nature was certainly not on my side this year; even the spring onions I started inside didn't take.
Last weekend proved the perfect opportunity for me to plant as the weather was a bit on the cool side, and the rain actually let up for a change.  My husband and I spent one day just prepping the soil.  While the last two years have been productive, I thought the quality of the soil needed to be improved for this year so we added several bags of mushroom compost, cow manure and garden top soil to really give the plants the food they needed.

All ready for planting!  The soil was so soft and
pillowy you sort of sank in it when you walked.
A rented tiller (an absolute must for this tough work!) made for a fun afternoon project for my husband.  Any time he gets to play with power tools or yard equipment it's a good day for him.  But man was he a huge help!  Another new thing we are trying this year is the addition of peat moss.  After last year's scorchingly hot temperatures with little to no rain I wanted to be sure to hedge my bets on the soil being able to retain water.  Peat moss loosens compacted soil and improves water retention, aeration and drainage.  It also helps prevent the leaching of valuable nutrients and promotes root development.  Where was this stuff last year when I needed it?  Lesson learned.

Mapping out where you want things
to go helps make sure you stay organized.
One of my favorite things to grow is peppers so I always plant a large variety - - Bell Pepper, Jalapeño, Serrano,  Habanero, and Poblano.  I plan to utilize them in all manner of ways including salads, salsas, stuffed jalapeños (wrapped in bacon, on the grill!), guacamole and of course pickling.  There is something strangely addicting about pickled jalapeños.  They are great in Bloody Mary's too!

Radishes starting to sprout
after just one week!
The other thing I love to grow are tomatoes.  This year I planted Yellow Pear, Cherry, Roma, Early Girl, and a Black Krim Heirloom variety.  I think we might eat a variety of tomato with every meal once they start coming in.  Caprese salads with mozzarella and fresh Basil are a favorite although we eat them in dozens of other types of salads.  And my husband's favorite dish is a called Pasta Ponza which has roasted cherry tomatoes with bread crumbs, parmesan cheese and capers, all baked until crispy and golden and then tossed with pasta.  It is delicious! I will definitely share that one in a future blog.

In addition to the peppers and tomatoes, I am growing Pattypan Squash and a Magic 8 zucchini which is a new variety for me.  Small and compact the pattypan are really great on the grill, and go perfectly with my fresh pesto.

Oregano, Chives, Rosemary and Dill.  They
will grown in quite nicely and fill the pot
as they grow.
I also planted two different kinds of Cucumbers, Lettuce/Mesclun, Radishes, Carrots, and Onions.  Like the tomatoes, there are a variety of dishes I utilize the cucumbers in including pickling them and serving them sliced super thin in a Red Wine vinegar dressing with dill and onions.

My plants usually tend to give me way more cucumbers than we could ever eat so I give some to friends, co-workers and random people on the street.  :)  But seriously, it is usually a pretty grand bounty which makes me feel like an accomplished gardener.

To make sure I can get all those veggies to fit in my little garden, I have to do some pre-planning.  I like to actually draw it out and give myself a few options.  You need to take into consideration if any parts of your garden get more sunlight than others and of course you should think ahead to how you are going to reach the plants to harvest from them.  The version/layout pictured here was version #5 I think.  I always go back and forth on where I want to put things, and inevitably, I don't end up with everything right where I mapped it, but for the most part I  try and stick with the plan.
Basil and Thyme.  I'm going to add Thai Basil
to this pot in the open space remaining.

In addition to the vegetable garden, I also have a pretty extensive herb garden this year.  For most of the recipes I make throughout the summer, it is the herbs that add the perfect accent to the dishes.  After all, a Caprese Salad isn't a Caprese without the Basil!

Cleaned Radish Sprouts make a great addition
to salads.  Their peppery bite hints at the
tasty harvest to come
This year I am growing Basil, Thyme, Rosemary, Dill, Oregano, Chives, Parsley and Cilantro.  Its spread out amongst a few different larger pots and I have my Cilantro in a separate smaller container.  It is more fussy and needs to be kept in cooler places to keep it from "bolting", which really just means it goes to flower.  Because I know I will want to make lots of pesto I also have several other flower boxes of just Basil seedlings (which you might remember I started this Spring inside) that are coming along quite nicely.

I will continue to post pictures of the garden so you can see the progress as we move through the season.  It is always amazing to me how quickly the plants go from small little plantings (or seeds even!) to full grown plants that make the garden their domain.  Having plants that produce results at different times makes gardening a lot more rewarding as well.  Just two weeks in and I'm already thinning out my Radishes and enjoying salads with the greens that I pulled.  Its amazing how quickly they grow!

A view from the front gate of the garden. And once it stops
raining for more than a day I will clean off the path!
That pot on the step is my garlic!
Nurturing the garden and watching things grow and become ready to harvest helps me to appreciate the food we eat and the work that goes into making it a reality.  It might sound cliche but it really is true that nothing tastes quite as good as vegetables grown from your own garden.  There is a satisfaction that growing and producing your own food brings that can't be explained.  You just have to experience it for yourself.

The wonder of watching as the garden takes on its own identity - - as the bees busily go about doing their jobs, and the plants reach for the sky - - makes me truly appreciate the flavors and the bounty from the garden each and every year.  There really is something quite special about getting to be there and about being a witness to the magic that is a garden.

Another view of the garden; Tomatoes in cages, cucumbers along
the back with trellises and the radishes coming in along the front.  

Tuesday, May 21, 2013

A Taste Of The Unexpected

There are some ingredients I just love to experiment with.  Additions that take recipes from just ok or ordinary, and make them something more memorable and delicious.  One of those ingredients is bacon.

So I have your attention now, don't I?

There is just something about bacon that makes people happy.  The smell of it cooking on a Saturday morning just seems to make everything seem ok.  Eating it seems like a guilty pleasure and a reward all at the same time.   So adding it to dishes when you don't really expect to find it is something I love doing.  This recipe for Spicy Bacon Mixed Nuts is a perfect representation of that concept.

Thick cut bacon works well!
The flavor that is imparted from the bacon adds a touch of smoky richness that the roasted nuts just wouldn't have on their own.  That, contrasted with the spicy heat from the cayenne and the sweetness from the sugar makes each handful a perfect bite.

I adapted this recipe from one of Giada's and when I read the recipe I just knew it would be a huge hit with my family.  This past Thanksgiving, I was making a batch and had it cooling on the counter when my parents arrived.  They had no sooner than set down their luggage inside the door, hugged me and then we dove into the pan!  We all three stood there shoveling the bacon-y goodness into our mouths, laughing.  Mmmmm, bacon!  Just a few days later, my in-laws arrived for our version of Thanksgiving, and they too were hard pressed to keep from going back to the pantry for nibbles of the crunchy treat.  I knew I had found a keeper for sure!
When it is first added to
the pan, it is a bit crowded.   

Assembling these is really quite simple.  First, take about half a package of bacon and cut it into small 3/4 inch pieces.  I choose to use a thicker cut because I like the texture it has once it is cooked.  If you love Applewood smoked or Maple flavored bacon, I think this recipe would adapt well to whatever you like best or have on hand.  So after you cut up the bacon, sauté it over medium heat until it is cooked through and golden and crispy.

After it is cooked through, the bacon
is crispy and moves around the pan easily.
When you first put it in the pan it will be somewhat crowded but it will cook down and shrink up into little bite sized pieces.  (You can see both of the posted pictures to get a better idea of what I mean.) Keep an eye on it so it doesn't burn, but using the medium heat will ensure it all gets cooked through evenly.  You won't be cooking it any further so be sure and get it nice and crispy at this stage.  Feel free to conduct tasting experiments to ensure it is at its full level of deliciousness.  I find that cooking bacon usually draws any interested "taste testers" who might be home into the kitchen!

Using a slotted spoon, remove the cooked bacon to a paper towel lined plate and allow to cool.  Reserve the bacon fat into a measuring cup, being careful not to burn yourself on the hot grease.  If you decide to make a double batch, be sure and cook off the bacon in two batches to ensure your bacon cooks to the crispy and crunchy final product you are looking for.

Save that egg yolk for something else,
because you won't need it for this recipe.
While the bacon is cooking, you can prepare all the other ingredients.  Separate one large egg white and add it to a larger mixing bowl -- one large enough to handle all the ingredients you will be adding! -- and whisk it with a teaspoon of kosher salt until it is foamy and well incorporated.  Slowly add in 1/3 of a cup of granulated sugar and about a teaspoon of cayenne and mix until it is well combined.

You can certainly control the heat level by adding more or less of the spice.  I like these to have some good heat to them to really contrast with the salty bacon and the sugar coating.  It adds a depth of flavor and unexpected taste to the final product that I really enjoy.

Egg white, salt, sugar, cayenne
and nut mixture...
At this point, you can add in your mixed nuts.  Really the sky is the limit here, but I love the combination of pecans, walnuts and almonds.  For a single batch, I used about 1 cup of each of the kinds of nuts....more of the pecans just because they are my favorite.  Using a large spoon or spatula, mix the nuts well, being sure to coat them all in the egg white mixture.  Take the reserved bacon grease and spoon it onto the rimmed baking sheet.  I use a Tablespoon measure for this step and add the grease just until it coats the bottom of the pan.  Tilt the pan back and forth to get it to cover evenly.  This step adds a lot of bacon flavor to the end product so I recommend that you don't skip it.  If you want to cut back some on the calories and fat then just use a little bit of the grease.

All set for the oven! 
Scoop the nut mixture onto the pan and spread it out evenly.  Bake in a 325 degree oven, until crispy and roasted, turning and stirring the mixture every 10-15 minutes or so.  Depending on your oven and the size of the baking sheet you are using, the total cook time can vary so keep checking on them to ensure you don't burn them.  For me, 30 minutes is just about perfect.  When you first take the nuts out, they may be just a little bit soft still, but they will crisp up as they cool.

Set the pan on the counter to completely cool (if you have that kind of willpower) and then scrape the mixture into a bowl.  Take the cooked crispy bacon you set aside earlier and mix it together with the nuts.

This mixture will stay fresh and tasty in airtight tupperware containers or ziplock baggies in a cool dry place, for the few days that it will take you and your family to consume it.  I will give a fair warning here that the mixture does leave the pan in quite a sticky state.  My suggestion is to just fill the sink with hot, soapy water rather than trying to wrestle with it.  I'm sure you can find something to munch on while you wait for it to soak!

Spicy Bacon Close Up!